
参考文章
【1】http://www.cnblogs.com/beenupper/archive/2012/07/13/2589749.html
【2】http://www.cnblogs.com/beenupper/archive/2012/07/18/2597504.html
功能需求:在初次加载每个Activity时,页面载入不同的引导界面。
思路:
1、每个Activity动作都一样,所以必须封装一个BaseActivity,在onStart()方法中实现加载引导页,并对外提供加载接口。其他Activity extends BaseActivity
2、只需要初次加载时显示引导页,所以引入SharedPreferences,用于保存该Activity是否为初次加载
由于引导过的界面就没必要再次引导了。所以得保存记录。这里采用偏好设置保存,如果该Activity被引导过了,就将它的类全名保存下。
由于偏好设置只能保存键值(key-value)对,所以保存多个类名,我采用|a|b|c这种形式保存为value。
3、显示引导页其实就是展示一个全屏的ImageView,在UI上体现为FrameLayout动态加载一个图层,当不需要时remove
4、怎样获取每个Activity这个啥啥FrameLayout?可以考虑使用DecorView(DecorView为整个Window界面的最顶层View,相关介绍见参考文章【1】)。
只需要解决怎么找到那个Framelayout,我这里想到的办法是给每个xml布局的根元素设置一个id,通过findViewById找到咋们通过setContentView设置上布局,
再通过View的view.getParent();得到它的父元素。它的父元素不就是咋们的要的FrameLayout吗?
然后创建一个ImageView设置上引导图片加到FrameLayout就可以了
直接上代码吧。
(1)实现MyPreferences.java。实现保持Activity是否为初次加载。
1 2 3 4 5 6 7 8 9 10 11 12 13 14 15 16 17 18 19 20 21 22 23 24 25 26 27 28 29 30 31 32 33 34 35 36 37 38 39 40 41 42 43 | package com.amanda.guidetest;import android.content.Context;public class MyPreferences { //偏好文件名 public static final String SHAREDPREFERENCES_NAME = "my_pref"; //引导界面KEY private static final String KEY_GUIDE_ACTIVITY = "guide_activity"; /** * 判断activity是否引导过 * * @param context * @return 是否已经引导过 true引导过了 false未引导 */ public static boolean activityIsGuided(Context context,String className){ if(context==null || className==null||"".equalsIgnoreCase(className))return false; String[] classNames = context.getSharedPreferences(SHAREDPREFERENCES_NAME, Context.MODE_WORLD_READABLE) .getString(KEY_GUIDE_ACTIVITY, "").split("\\|");//取得所有类名 如 com.my.MainActivity for (String string : classNames) { if(className.equalsIgnoreCase(string)){ return true; } } return false; } /**设置该activity被引导过了。 将类名已 |a|b|c这种形式保存为value,因为偏好中只能保存键值对 * @param context * @param className */ public static void setIsGuided(Context context,String className){ if(context==null || className==null||"".equalsIgnoreCase(className))return; String classNames = context.getSharedPreferences(SHAREDPREFERENCES_NAME, Context.MODE_WORLD_READABLE) .getString(KEY_GUIDE_ACTIVITY, ""); StringBuilder sb = new StringBuilder(classNames).append("|").append(className);//添加值 context.getSharedPreferences(SHAREDPREFERENCES_NAME, Context.MODE_WORLD_READABLE)//保存修改后的值 .edit() .putString(KEY_GUIDE_ACTIVITY, sb.toString()) .commit(); }} |
(2)修改BaseActivity.java。实现动态加载引导界面,并提供接口。
1 2 3 4 5 6 7 8 9 10 11 12 13 14 15 16 17 18 19 20 21 22 23 24 25 26 27 28 29 30 31 32 33 34 35 36 37 38 39 40 41 42 43 44 45 46 47 48 49 50 51 52 53 54 55 56 57 58 | package com.amanda.guidetest;import android.app.Activity;import android.view.View;import android.view.ViewGroup;import android.view.ViewParent;import android.widget.FrameLayout;import android.widget.ImageView;import android.widget.ImageView.ScaleType;public class BaseActivity extends Activity { private int guideResourceId=0;//引导页图片资源id @Override protected void onStart() { super.onStart(); addGuideImage();//添加引导页 } /** * 添加引导图片 */ public void <font color="#ff0000">addGuideImage</font>() { View view = getWindow().getDecorView().findViewById(R.id.my_content_view);//查找通过setContentView上的根布局 if(view==null)return; if(MyPreferences.activityIsGuided(this, this.getClass().getName())){ //引导过了 return; } ViewParent viewParent = view.getParent(); if(viewParent instanceof FrameLayout){ final FrameLayout frameLayout = (FrameLayout)viewParent; if(guideResourceId!=0){//设置了引导图片 final ImageView guideImage = new ImageView(this); FrameLayout.LayoutParams params = new FrameLayout.LayoutParams(ViewGroup.LayoutParams.FILL_PARENT, ViewGroup.LayoutParams.FILL_PARENT); guideImage.setLayoutParams(params); guideImage.setScaleType(ScaleType.FIT_XY); guideImage.setImageResource(guideResourceId); guideImage.setOnClickListener(new View.OnClickListener() { @Override public void onClick(View v) { frameLayout.removeView(guideImage); MyPreferences.setIsGuided(getApplicationContext(), BaseActivity.this.getClass().getName());//设为已引导 } }); frameLayout.addView(guideImage);//添加引导图片 } } } /**子类在onCreate中调用,设置引导图片的资源id *并在布局xml的根元素上设置android:id="@id/my_content_view" * @param resId */ protected void <font color="#ff0000">setGuideResId</font>(int resId){ this.guideResourceId=resId; }} |
(3)修改Activity(例如MainActivity)的xml布局文件,在最顶层布局layout中加入id:my_content_view
<RelativeLayout xmlns:android="http://schemas.android.com/apk/res/android" xmlns:tools="http://schemas.android.com/tools" android:layout_width="match_parent" android:layout_height="match_parent" tools:context=".MainActivity" android:id="@id/my_content_view"> <TextView android:id="@+id/txt" android:layout_width="wrap_content" android:layout_height="wrap_content" android:layout_centerHorizontal="true" android:layout_centerVertical="true" android:text="@string/hello_world" /> <Button android:id="@+id/btn_close" android:layout_width="wrap_content" android:layout_height="wrap_content" android:layout_below="@+id/txt" android:text="@string/btn_back"> </Button></RelativeLayout>
(4)修改res/values/ids.xml,增加id
<?xml version="1.0" encoding="utf-8"?><resources xmlns:android="http://schemas.android.com/apk/res/android"> <item type="id" name="my_content_view"></item> </resources>
(5)在MainActivity.java的onCreate()中调用接口setGuideResId(),设置要加载的引导界面图片
package com.amanda.guidetest;import android.content.Intent;import android.os.Bundle;import android.view.Menu;import android.view.View;import android.widget.Button;public class MainActivity extends BaseActivity { @Override protected void onCreate(Bundle savedInstanceState) { super.onCreate(savedInstanceState); setContentView(R.layout.activity_main); Button btn = (Button)findViewById(R.id.btn_close); btn.setText(this.getString(R.string.btn_go)); btn.setOnClickListener(new View.OnClickListener(){ @Override public void onClick(View v) { startActivity(new Intent(MainActivity.this, SubActivity.class)); } }); setGuideResId(R.drawable.yindao01);//添加引导页 } @Override public boolean onCreateOptionsMenu(Menu menu) { // Inflate the menu; this adds items to the action bar if it is present. getMenuInflater().inflate(R.menu.activity_main, menu); return true; } }(6)最后,上几张图片吧
(有引导界面)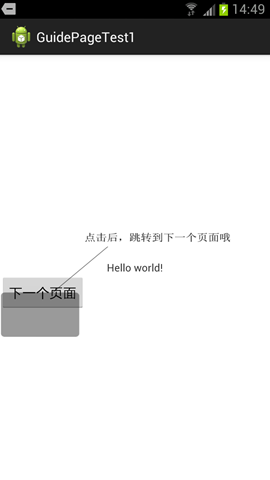 (没有引导界面)
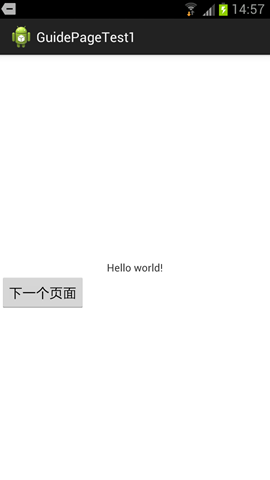
总结(重要部分,已用红色标明):
(1)增加MyPreferences.java
(2)修改BaseActivity.java
(3)修改res/values/ids.xml
(4)在需要加载引导界面的Activity的布局文件中,在最顶层布局layout中加入id,android:id="@id/my_content_view"
(5)在需要加载引导界面的Activity的java代码中,调用接口setGuideResId(),如setGuideResId(R.drawable.yindao01)
联系客服

