
内容[ 显示 ]
在本实验中,您将看到使用内部集成电路(I2C)协议的同步串行通信。您将与微控制器的红外温度传感器芯片通信,以读取传感器前方物体的温度。
为了充分利用本实验,您应该熟悉Arduino的微控制器编程的基础知识。如果不是,请查看数字输入侧输出状语从句:实验室,以及Arduino的入门指南。您还应该了解异步串行通信以及它与同步串行通信的区别。
 |  |  |
|---|---|---|
| 22-AWG连接线 | Arduino的模块 | TMP007红外温度传感器分线板 |
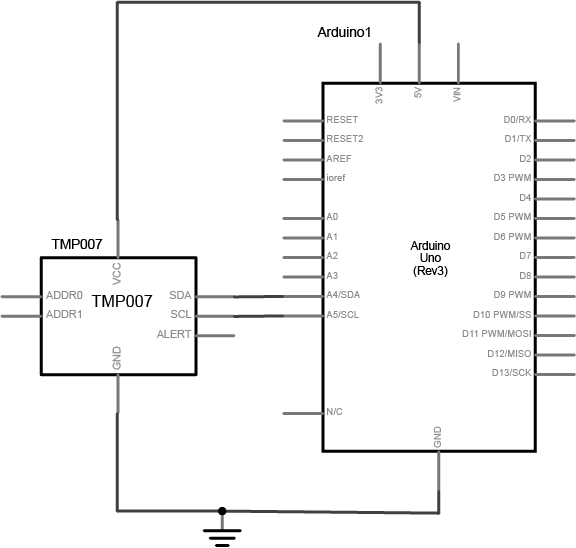
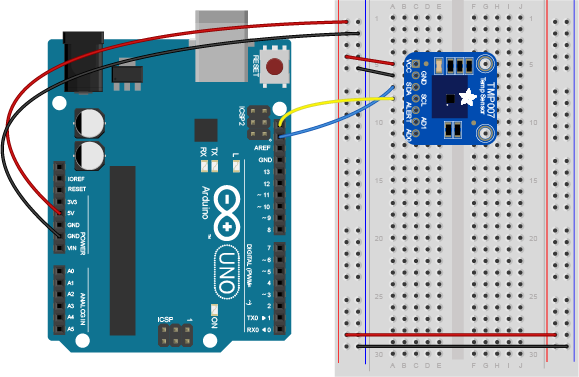
本实验中使用的温度传感器是 Texas Instruments TMP007,它是一种集成电路(IC),可以读取放置在其前面的物体的温度。连接传感器的电源和接地连接以及时钟和串行数据的连接,如下所示(对于Arduino UNO板,I2C引脚固定为A4(SDA)和A5(SCL)):
 |  |
|---|---|
| 概要 | TMP007温度传感器连接到Arduino的 |
电路现已完成,您已准备好编写程序来控制它。I2C同步串行协议(与SPI协议相反)的优点之一是您只需要两条线路即可与一个或多个设备进行通信。
I2C devices exchange bits of data whenever the shared clock signal changes. Controller and peripheral devices both send bits of data when the clock changes from low to high (called the rising edge of the clock). Unlike with SPI, they cannot send data at the same time.
The TMP007 has a series of memory registers that control its function. You can write to or read from these registers using I2C communication from your microcontroller. Some of these registers are writable by the controller so that you can configure the sensor. For example, you can set its I2C address, set the sensitivity of the sensor, and so forth. Some registers are configuration registers, and by writing to them, you configure the chip. For example, you can set lower and upper limits of temperature sensitivity. Other memory registers are read-only. For example, when the sensor has read the temperature of an object, it will store the result in a register that you can read from the controller. The details of the chip’s registers can be found in the TMP007 datasheet, in the “Register Maps” section, page 26.
I2C devices exchange data in 7-bit chunks, using an eighth bit to signal if you’re reading or writing by the controller or for acknowledgement of data received. To get the temperature from the TMP007, your controller device sends the sensor’s address (a 7-bit number) followed by a single bit indicating whether you want to read data or write data (1 for read, 0 for write). Then you send the memory register that you want to read from or write to. For example, the object temperature is stored in memory register 01 of the TMP007. To get the temperature, you send:
To use I2C communication on an Arduino microcontroller, you use the Wire library, which is built into the Arduino IDE. You can find Arduino-compatible libraries for many devices that use the Wire library, but never expose it directly in their APIs. Adafruit’s TMP007 library is typical of this style of library. The library’s readObjTempC() command sends a write command to start a temperature reading of the object in front of the sensor, then sends a read command to read the appropriate temperature register, then combines the results using a formula explained in the datasheet on page 25, then returns the result to you as degrees celsius. Similarly, the readDieTempC() sends a write command to read the chip temperature, then a read command to read the appropriate temperature register, then does the math and gives you the result.
The TMP007 library relies on the Adafruit Sensor library in addition to the Wire library, so you’ll need both in order to make this work. You can download the TMP007 library here and the Sensor library here. Make sure you’re using Arduino version 1.5.5 or later.
Once you’ve downloaded the libraries, change the name of the resulting .zip file to remove the words -master or _Library-master from the end of the file name. Keep the .zip extension though. Open the Arduino IDE (version 1.5.5 or later) and choose the Sketch menu, then choose Import Library… and finally click the Add Library… option. A dialog box will pop up asking you to find the library you want to add. Navigate to the .zip file for the Sensor library and choose it. The library will be added and you’ll see the words “Library added to your libraries. Check the ‘Import Library’ menu”.
At the beginning of your code, include the appropriate libraries. In the setup(), initialize the sensor with begin(). If the sensor responds, then begin() will return true, and if not, it will return false. This is how to check that the sensor is properly wired to your microcontroller:
#include <Wire.h>#include <Adafruit_Sensor.h>#include <Adafruit_TMP007.h>Adafruit_TMP007 tmp007; // instance of the sensor libraryvoid setup() { Serial.begin(9600); boolean sensorInitialized = tmp007.begin(); // initialize the sensor while (!sensorInitialized) { // Do nothing until sensor responds Serial.println("Sensor is not responding"); }}The TMP007 can only read every four seconds. In the main loop, set up an if statement to check when the millis() passes another four seconds using the modulo operator:
void loop() {if (millis() % 4000 < 2) { // if 4 seconds have passed }}Inside that if statement, read the object temperature and the chip temperature and print them both out:
void loop() { if (millis() % 4000 < 2) { // if 4 seconds have passed float objectTemp = tmp007.readObjTempC(); // read object temperature float chipTemp = tmp007.readDieTempC(); // read chip temperature // print the results: Serial.print("Chip temperature: "); Serial.print(chipTemp); Serial.print(" deg. C. \t Object temperature: "); Serial.print(objectTemp); Serial.println(" deg. C"); }}As you can see, you’re never actually calling commands from the Wire library directly, but the commands in the TMP007 library are relying on the Wire library. This is a common way to use the Wire library to handle I2C communication.
I2C is a common protocol among many ICs, and it’s handy because you can combine many devices on the same bus. You need to make sure the device addresses are unique. Each device will have its own way to change the address. For the TMP007, see Table 2 in the data sheet; you have to set the address pins (AD1 and AD0 on the breakout board appropriately to change the address.
如何您在面包板上构建自己的Arduino兼容电容或使用像Adafruit Trinket或Trinket Pro这样的电路板,这可能是在一个更复杂的项目中组合多个控制器的廉价方法。请参见电线库主从示例(主读取器/发送从器 状语从句: 主写入器/从器件读取器)。
联系客服


