android实用测试方法之Monkey与MonkeyRunner前言
本人比较懒,但是,研究如何让人变懒,却很积极…最新版的android SDK 4.0 ,monkey和monkeyRunner,变化很大…大到默认是运行失败的…囧,虽然,monkey和monkeyrunner目前有些不完善,但是,足以应付我们的使用需要.(最新的R15已经解决了这个问题更新真快…)
Android UI 测试懒人第一:胡乱的按键,交给电脑搞定
有时候,我们要折腾一下程序,健壮不健壮,然后,找个上幼儿园的的弟弟/妹妹,把手机交给他/她,让他/她胡乱的按,看你的程序能不能接受这样的折腾,但是,我们身边不可能都有正太和萝莉,也不能保证他们拿到手机以后不是测试软件的健壮性,反而测试你的手机经不经摔,这与我们的期望差太远了…毕竟咱们是来软的不是来硬的…
当然,这世界牛人一把把的,然后,google公司考虑到我们的需要,把找个由某个牛人写的程序,集成到了比较新版本的SDK R8(即 android 2.2以后),然后,就有了下文
monkey 的使用
Monkey的智力就是一个三岁小孩的水平,所以,使用起来也是非常简单,当然,也做不了什么复杂的东西
1
adb shell monkey [options] <event-count>
optionsevent-count
这个是配置monkey的设置,例如,指定启动那个包,不指定将会随机启动所有程序这个是让monkey发送多少次事件
详细的monkey介绍,和options的参数请查看
http://developer.android.com/guide/developing/tools/monkey.html这里就不重复造轮子了…
实例:
我们验证程序在随机1000次事件中,能不能正常运行下去
1
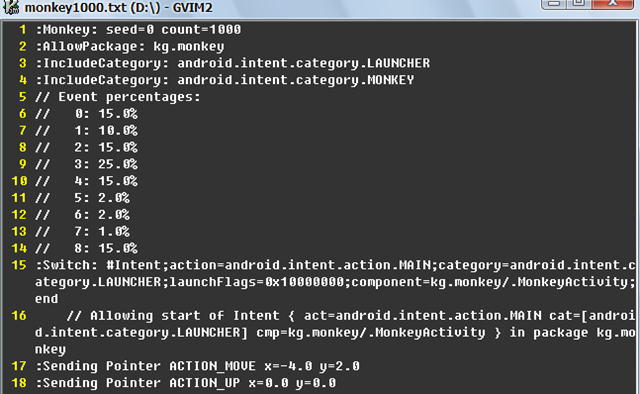
adb shell monkey -p your.package.name -vvv 1000 > monkey1000.txt
-v 为 verbose的缩写,就是详细输出事件等级,这个3个v就是输出等级1至3的所有事件,然后再使用管道命令将输出结果放到一个文本里面方便查看.接下来就是看你的程序能不能在这样的折腾下坚持下去了.
以上截个图看看吧
------------------------------以下为折腾星人研究参考资料------------------------------
然后,补充一下官方文档并没有更新的参数…不信你自己对照着来看,如果,你看到时候,官方更新了我说的这个,希望能回复我一下,让我更新一下…
主要多了两个参数:
[--port port]指定monkey的端口,实现使用Client-server Monkey,这个参数的作用就是让你可以通过telnet来手动设置monkey的参数,就是让monkey的智力进化到能听懂能的话…可惜的是我一直都没搞成功.
[--setup scriptfile] [-f scriptfile ….]这个是让monkey 指定手机中的脚本运行.
这里我贴一个,国外有人用本地指定scriptfile成功的使用
I am trying to do 2 things with monkey
1. Execute a script with a command like
adb shell monkey -p MY_PACKAGE --setup scriptfile -f /sdcard/ mon_script1.txt 1
where mon_script.txt contains a few touch commands. After I execute this, I see nothing happening on the screen. It even does not give me the "Number of events injected message". I have verified that my touch co-ordinates fall over actual UI elements.
This is the script file I am using
tap 79 29 tap 100 100 tap 200 200 tap 300 300 quit
2. Execute Monkey Network control to type commands individually. I start up monkey to listen to a port and use PuTTY to send commands. I get "OK" return messages, but nothing happens on the screen.
Whenever I use monkey in the random mode, I see interaction on the screen. But I need to get one of the above 2 methods to work. I have seen the sources of monkey and nothing seems to be wrong. Has anyone used monkey in the above described way? If so, please tell me what I am doing wrong.
使用远程monkey 的代码模板
1
adb –e shell monkey -p your.pakagename --port 1080 &
然后重定向我们的模拟器端口
1
adb -e forward tcp 1080 tcp 1080
然后telnet 的我们的模拟器
1
telnet localhost 1080
接着telnet成功以后据说可以这样
tap 150 200
----以上代码来源于Android application Test Guide 书中
然后,就可以看到我们控制UI事件了,可惜的是,我怎么测试都不能成功…
小结:
目前看来,monkey这个程序其实并不完善,有些功能连官方文档都还没更新,不过,作为折腾应用的使用还是足够的,看着自己的程序在模拟器中不断的被折磨…接下来要讲就是Monkey的进化--->MonkeyRunner
MonkeyRunner
如果,把现阶段的monkey比做是幼儿园的小孩,那么monkeyrunner就是一个初中生了…它支持,自己编写插件,控制事件,随时截图,简而言之,任何你在模拟器/设备中能干的事情,MonkeyRunner都能干,而且还可以记录和回放!!!
具体介绍…看官方文档.这里还是不重复造轮子
http://developer.android.com/guide/developing/tools/monkeyrunner_concepts.html注意:android sdk r14并没有把一个关键的jar包放lib目录中,所以,将无法运行,…然后请将SDK TOOLS 直接更新到最新的R15
下面提供一些常用的脚本,自己看着来改吧..
monkey_recorder.py
monkey_placback.py
help.py
http://115.com/file/e6r0sln9#monkeyrunner_py脚本.rar
虽然,少了些东西,但是,并不影响我们大部分的需要.接下来用一段典型的monkeyRunner代码讲解!
注意!如果monkeyrunner脚本文件要使用中文,记得格式保存为utf8,不然会ASCNII(忘了怎么拼写了..)无法支持错误
1
2
3
4
5
6
7
8
9
10
11
12
13
14
15
16
17
18
19
20
21
22
23
24
25
26
27
28
29
30
31
32
#导入我们需要用到的包和类并且起别名
import sys
from com.android.monkeyrunner import MonkeyRunner as mr
from com.android.monkeyrunner import MonkeyDevice as md
from com.android.monkeyrunner import MonkeyImage as mi
#connect device 连接设备
#第一个参数为等待连接设备时间
#第二个参数为具体连接的设备
device = mr.waitForConnection(1.0,'emulator-5554')
if not device:
print >> sys.stderr,"fail"
sys.exit(1)
#定义要启动的Activity
componentName='kg.monkey/.MonkeyActivity'
#启动特定的Activity
device.startActivity(component=componentName)
mr.sleep(3.0)
#do someting 进行我们的操作
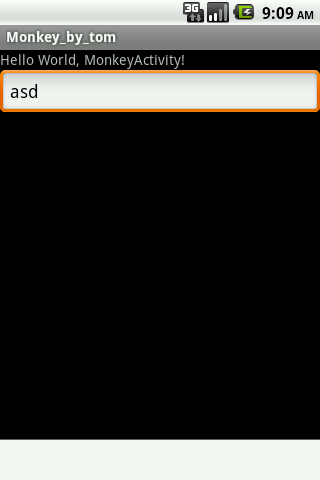
#输入 a s d
device.type('asd')
#输入回车
device.press('KEYCODE_ENTER')
#return keyboard 点击返回用于取消等下看到截图的下方的白条
#device.press('KEYCODE_BACK')
#------
#takeSnapshot截图
mr.sleep(3.0)
result = device.takeSnapshot()
#save to file 保存到文件
result.writeToFile('takeSnapshot\\result1.png','png');
以上代码就是用monkeyrunner 实现操作特定操作以后,并且截图的功能,看上去貌似挺麻烦的…如果你有很多设备要一起测试,你就会发现以上代码是多么爽丫丫的事情.这个脚本的实质就是一个python脚本,懂点,python的朋友,可以利用这个实现非常强悍的功能.这里就打住了,各位想到什么好玩,实用的记得回复一下…大家一起交流.
monkeyRunner 的记录和回放
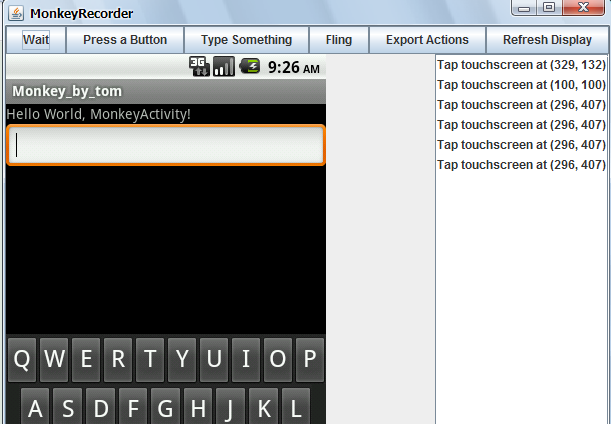
前面讲的都是一些在命令行上的操作,我可记不住那么多的指令操作,我可不知道,我点击的这个点的坐标是多少,我多么希望,我能够在可视化界面里面讲我的操作记录下来,然后,直接重新播放,就像宏一样,我可以很高兴的告诉你,MonkeyRunner有这个功能实现起来也非常简单,我提供的打包文件中有一个,monkey_recorder.py,直接在命令行中打上:
1
monkeyrunner monkey_recorder.py
例如我们删掉我们刚才的asd字符串它就会记录下我们所有的操作!,就会看到如上截图!!!
ButtonDescription
Wait等待时间
Press a Button发送,MENU,HOME,or SEARCH 按钮.Press,Down,or Up事件
Type Something发送一些字符串
Fling用来操作虚拟键盘
Export Action将我们的脚本导出来
Refresh Display刷新当前界面
接下来运行我们的保存的脚本,然后,你就看到模拟器,进行你刚才一样的操作
1
monkeyrunner monkey_playback.py monkey_test.mr
打开我们的文件可以看到其实就是一些monkeyrunner的一些脚本
TOUCH|{'x':329,'y':132,'type':'downAndUp',}
TOUCH|{'x':100,'y':100,'type':'downAndUp',}
TOUCH|{'x':296,'y':407,'type':'downAndUp',}
TOUCH|{'x':296,'y':407,'type':'downAndUp',}
TOUCH|{'x':296,'y':407,'type':'downAndUp',}
TOUCH|{'x':296,'y':407,'type':'downAndUp',}
TOUCH|{'x':351,'y':227,'type':'downAndUp',}
当然,有界面为什么不用呢~~~呵呵~
补充一点:如果我们要进行多设备测试怎么办呢?
我们可以打开monkey_playback.py文件
1
2
3
4
5
6
7
8
9
10
11
12
13
14
15
16
17
18
19
20
21
22
23
24
25
26
27
28
29
30
31
32
33
34
35
36
37
38
39
40
41
42
43
44
45
46
47
48
49
50
51
52
import sys
from com.android.monkeyrunner import MonkeyRunner
# The format of the file we are parsing is very carfeully constructed.
# Each line corresponds to a single command. The line is split into 2
# parts with a | character. Text to the left of the pipe denotes
# which command to run. The text to the right of the pipe is a python
# dictionary (it can be evaled into existence) that specifies the
# arguments for the command. In most cases, this directly maps to the
# keyword argument dictionary that could be passed to the underlying
# command.
# Lookup table to map command strings to functions that implement that
# command.
CMD_MAP = {
'TOUCH': lambda dev, arg: dev.touch(**arg),
'DRAG': lambda dev, arg: dev.drag(**arg),
'PRESS': lambda dev, arg: dev.press(**arg),
'TYPE': lambda dev, arg: dev.type(**arg),
'WAIT': lambda dev, arg: MonkeyRunner.sleep(**arg)
}
# Process a single file for the specified device.
def process_file(fp, device):
for line in fp:
(cmd, rest) = line.split('|')
try:
# Parse the pydict
rest = eval(rest)
except:
print 'unable to parse options'
continue
if cmd not in CMD_MAP:
print 'unknown command: ' + cmd
continue
CMD_MAP[cmd](device, rest)
def main():
file = sys.argv[1]
fp = open(file, 'r')
#在这里指定你的设备吧
device = MonkeyRunner.waitForConnection()
process_file(fp, device)
fp.close();
if __name__ == '__main__':
main()
小结
至此,monkeyrunner的常用方式就这样完了,这里不打算说怎么编写一个自己的monkeyrunner插件,因为,我觉得我以上介绍的功能在实际开发中基本够用,而且,monkeyrunner估计,在下一个版本中会有一些更新,有兴趣的同学,自己查阅官方文档,当然,也可以联系本人…
国内莫非很少人写这方面的资料
不过也没关系了,如果,出现各种问题的话,提问题之前,先看下