
拦截器是动态拦截Action调用的对象。它提供了一种机制,使开发者可以定义一段代码,在Action执行之前或之后被调用执行,也可以在一个Action执行前阻止其执行,同时也可以提取Action中可重用部分的方式。通俗一点说,拦截器是一个实现了一定功能的类,它以一种可插拔的方式被定义在某个Action执行的之前或之后,用来完成特定的功能。
先来看下拦截器的声明周期
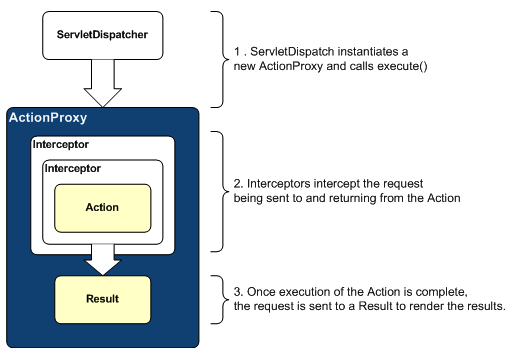
图中,我们可以发现,Struts2的Interceptor一层一层,把Action包裹在最里面。这样的结构,大概有以下一些特点:

为了能够正常使用拦截器,首先我们必须在struts.xml中正确部署拦截器。具体的做法为在<interceptor></interceptor>标签对内使用<interceptor/>标签引入具体拦截器,需要指定拦截器的名称和类:
1 2 3 4 5 6 7 8 9 10 11 12 13 14 15 16 17 | <?xml version="1.0" encoding="UTF-8"?> <!DOCTYPE struts PUBLIC "-//Apache Software Foundation//DTD Struts Configuration 2.0//EN" <struts> <package name="wwfy" extends="struts-default"> <interceptors> <interceptor name="拦截器名称1" class="拦截器类1" /> <interceptor name="拦截器名称2" class="拦截器类2" /> ……………………………………………………………………………………………………………………………………………… <interceptor name="拦截器名称N" class="拦截器类N" /> </interceptors> <!--省略Action配置信息--> </package> </struts> |
部署好拦截器之后,我们就可以利用拦截器为指定的Action应用添加功能了。具体的做法是在<action></action>标签对内使用<interceptor-ref/>标签引入所需的拦截器:
1 2 3 4 5 6 7 8 9 10 11 12 13 14 15 16 17 18 19 | <?xml version="1.0" encoding="UTF-8"?> <!DOCTYPE struts PUBLIC "-//Apache Software Foundation//DTD Struts Configuration 2.0//EN" <struts> <package name="wwfy" extends="struts-default"> <!--省略拦截器配置信息--> <action name="Action名" class="Action类"> <!--省略Action结果配置信息--> <interceptor-ref name="defaultStack"/> <interceptor-ref name="拦截器名1"/> <interceptor-ref name="拦截器名2"/> …………………………………………………………………………………………………… <interceptor-ref name="拦截器名N"/> </action> </package> </struts> |
当我们单独为某个Action单独配置拦截器的时候,系统默认的拦截器将会失效。此时为了Action仍然能够顺利执行,我们一般要通过<interceptor-ref name="defaultStack"/>手动引入defaultStack。
1 2 3 4 5 6 7 8 9 10 11 12 13 14 15 16 17 18 19 20 21 | <?xml version="1.0" encoding="UTF-8"?> <!DOCTYPE struts PUBLIC "-//Apache Software Foundation//DTD Struts Configuration 2.0//EN" <struts> <package name="wwfy" extends="struts-default"> <interceptors> <interceptor name="拦截器名称" class="拦截器类" > <param name="参数名">参数值</param> </interceptor> </interceptors> <action name="Action名" class="Action类"> <!--省略Action结果配置信息--> <interceptor-ref name="拦截器名"> <param name="参数名">参数值</param> </interceptor-ref> </action> </package> </struts> |
一个拦截器栈可以包括一个或者多个拦截器,也可以包括其他拦截器栈。
1 2 3 4 5 6 7 8 9 10 11 12 13 14 15 16 17 18 19 20 21 22 23 24 25 26 | <?xml version="1.0" encoding="UTF-8"?> <!DOCTYPE struts PUBLIC "-//Apache Software Foundation//DTD Struts Configuration 2.0//EN" <struts> <package name="wwfy" extends="struts-default"> <interceptors> <interceptor name="拦截器名称1" class="拦截器类1" /> <interceptor name="拦截器名称2" class="拦截器类2" /> ……………………………………………………………………………………………………………………………………………… <interceptor name="拦截器名称N" class="拦截器类N" /> <interceptor-stack name="拦截器栈1"> <interceptor-ref name="拦截器名称1"/> <interceptor-ref name="拦截器名称2"/> <interceptor-ref name="拦截器名称N"/> </interceptor-stack> <interceptor-stack name="拦截器栈2"> <interceptor-ref name="拦截器栈1"/> <interceptor-ref name="拦截器名称3"/> </interceptor-stack> </interceptors> </package> </struts> |
这部分和拦截器的配置一样,可通过<interceptor-ref/>标签引入
自定义拦截器有2种实现方式,一种是实现Interceptor接口,另一种是继承AbstractInterceptor类
1 2 3 4 5 6 7 8 9 10 11 12 13 14 15 16 17 18 19 20 21 22 | package wwfy.interceptor; import com.opensymphony.xwork2.ActionInvocation; import com.opensymphony.xwork2.interceptor.Interceptor; @SuppressWarnings("serial") public class CustomInterceptor1 implements Interceptor { public void destroy() { // TODO Auto-generated method stub } public void init() { // TODO Auto-generated method stub } public String intercept(ActionInvocation invocation) throws Exception { System.out.println("--------拦截器开始----------"); String result = invocation.invoke(); System.out.println("--------拦截器结束----------"); return result; } } |
2、继承AbstractInterceptor类
1 2 3 4 5 6 7 8 9 10 11 12 13 14 15 16 17 | package wwfy.interceptor; import com.opensymphony.xwork2.ActionInvocation; import com.opensymphony.xwork2.interceptor.AbstractInterceptor; @SuppressWarnings("serial") public class CustomInterceptor2 extends AbstractInterceptor { @Override public String intercept(ActionInvocation invocation) throws Exception { System.out.println("--------拦截器开始----------"); String result = invocation.invoke(); System.out.println("--------拦截器结束----------"); return result; } } |
在这个实现类中,实际上已经实现了最简单的拦截器的雏形。或许大家对这样的代码还比较陌生,这没有关系。我在这里需要指出的是一个很重要的方法invocation.invoke()。这是ActionInvocation中的方法,而ActionInvocation是Action调度者,所以这个方法具备以下2层含义:
所以,我们可以发现,invocation.invoke()这个方法其实是整个拦截器框架的实现核心。基于这样的实现机制,我们还可以得到下面2个非常重要的推论:
由此,我们就可以通过invocation.invoke()作为Action代码真正的拦截点,从而实现AOP。
定义中有这样一个拦截器栈
1 2 3 4 5 6 | <interceptor-stack name="xaStack"> <interceptor-ref name="thisWillRunFirstInterceptor"/> <interceptor-ref name="thisWillRunNextInterceptor"/> <interceptor-ref name="followedByThisInterceptor"/> <interceptor-ref name="thisWillRunLastInterceptor"/> </interceptor-stack> |
整个拦截器栈的执行顺序为

联系客服

